English
 Deutsch
 Español
 Français
 Italiano
 日本語
日本語 Русский
 中文
中文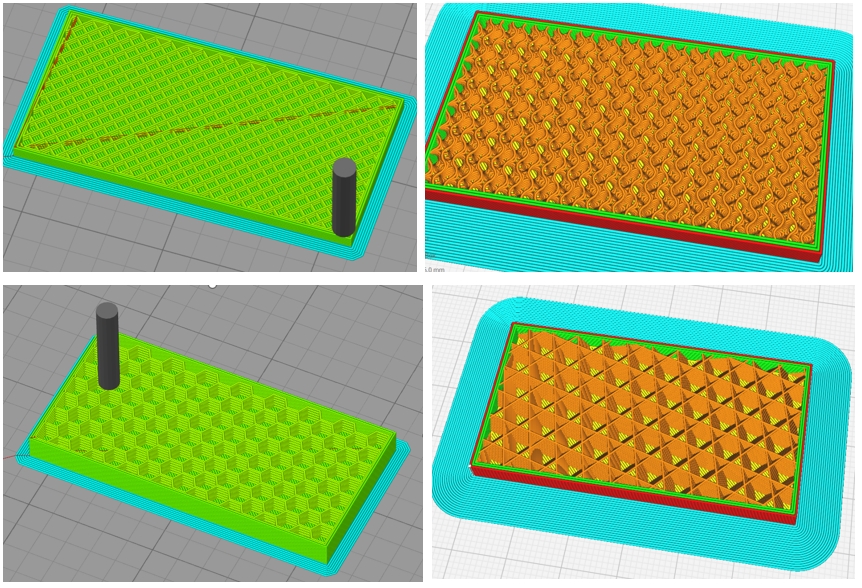
- Author
- 06 November 2025
Exploring the Fascinating World of Infill Patterns in 3D Printing
A technical guide to optimizing part strength, weight, and material efficiency through strategic internal geometry.
3D printing has revolutionized the way we create objects, allowing us to transform digital designs into physical reality with remarkable precision and versatility. One of the crucial aspects that contribute to the strength, weight, and print time of 3D printed objects is the infill pattern. In this blog, we’ll delve into the fascinating world of infill patterns, exploring what they are, why they matter, and the various types available.
1. WHAT IS INFILL IN 3D PRINTING?
Infill refers to the internal structure of a 3D printed object. While the outer shell (or perimeter) of a print defines its shape, the infill is the internal lattice-like pattern that fills the space inside. This pattern not only impacts the object’s strength and weight but also affects the amount of material used and the overall printing time.
2. WHY DOES INFILL MATTER?
- Strength and Durability:Different infill patterns provide varying degrees of strength. For instance, a higher infill density (closer to 100%) will result in a stronger and more durable object, suitable for functional parts that need to withstand stress.
- Weight Reduction:Lower infill densities create lighter objects, which can be advantageous for applications where weight is a critical factor, such as in aerospace or automotive industries.
- Material Usage:Infill patterns can significantly reduce the amount of filament used, making the printing process more cost-effective and environmentally friendly.
- Print Time:More complex infill patterns and higher densities increase the print time. Balancing between strength, material usage, and print time is key to optimizing 3D printing projects.
3. COMMON TYPES OF INFILL PATTERNS
3.1 Rectilinear
This is the most basic and commonly used infill pattern. It consists of straight lines that create a grid-like structure. It is efficient and provides decent strength but may not be the best for complex or highly stressed parts.
- P.S: In cura, it is called Zig Zag. In Simplify3d, Prusa slicer and bambu studio it is called Rectilinear
3.2 Honeycomb
Resembling a beehive’s structure, the honeycomb pattern is excellent for creating lightweight yet strong parts. Its hexagonal cells distribute stress evenly, making it ideal for functional components.
- P.S: This pattern is valid on Simpify3d,Prusa Slicer & bambu studio, but invalid on Cura
3.3 Gyroid
Known for its unique and visually appealing 3D labyrinth-like structure, the gyroid infill offers excellent strength in multiple directions. It’s particularly useful for objects requiring a balance between strength and flexibility.
- P.S: This pattern is valid on Cura,Prusa Slicer & bambu studio, but invalid on Simplify3d
3.4 Triangular
This pattern forms triangles within the infill, providing good strength and stability. It’s often used for parts that need to withstand compression forces.
- P.S: This pattern is valid on all of Cura,Prusa Slicer & bambu studio, and simplify3d
3.5 Cubic
A pattern that creates a 3D grid of cubes. It provides uniform strength in all directions and is suitable for parts that need to handle multi-directional stress.
- P.S: This pattern is valid on Cura,Prusa Slicer & bambu studio, but invalid on Simplify3d
3.6 Concentric
This infill pattern consists of concentric shapes (circles, squares, etc.) that follow the contour of the object. It’s great for parts that need to maintain strength around their perimeters.
- P.S: This pattern is valid on Cura,Prusa Slicer & bambu studio, but invalid on Simplify3d
How to select a right 3d printing slicer? Read More
4. CHOOSING THE RIGHT INFILL PATTERN
The choice of infill pattern depends on the specific requirements of your project. Here are some tips to help you decide:
- Functional Parts: For parts that will endure significant stress or load, consider using honeycomb, gyroid, or cubic infill patterns.
- Aesthetic Models: If the object is purely for display, a lower density infill like rectilinear or concentric can save material and print time.
- Flexibility Needs: For objects that need some flexibility, gyroid or honeycomb patterns are good choices.
- Print Time and Material: If reducing print time and material usage is a priority, opt for simpler patterns like rectilinear or triangular with a lower infill density.
CONCLUSION
Infill patterns play a crucial role in 3D printing, influencing the strength, weight, material usage, and print time of printed objects. Understanding the various infill options and their applications can help you optimize your 3D printing projects for specific needs. Whether you’re creating a sturdy functional part or a lightweight prototype, selecting the right infill pattern is key to achieving the desired performance and efficiency.