- Author
- 06 November 2025
Guide for surface roughness
Definition The Arithmetic Average Roughness, noted as Ra, is the absolute average relative to the base length. For simplicity, the Ra value indicates the average surface roughness for the length of the measurement performed, i.e., the average difference
Definition
The Arithmetic Average Roughness, noted as Ra, is the absolute average relative to the base length.
For simplicity, the Ra value indicates the average surface roughness for the length of the measurement performed, i.e., the average difference between peaks and valleys.

To schematize what roughness is, we can imagine a two-dimensional cut of the surface. The higher the roughness of this surface, the greater the difference between the peaks and valleys of the surface.
The roughness Ra is an excellent way to quickly check that the surface corresponds well to the customer’s request, its value is representative of the general condition of the surface.
WHY IS SURFACE ROUGHNESS SO IMPORTANT IN MANUFACTURING?
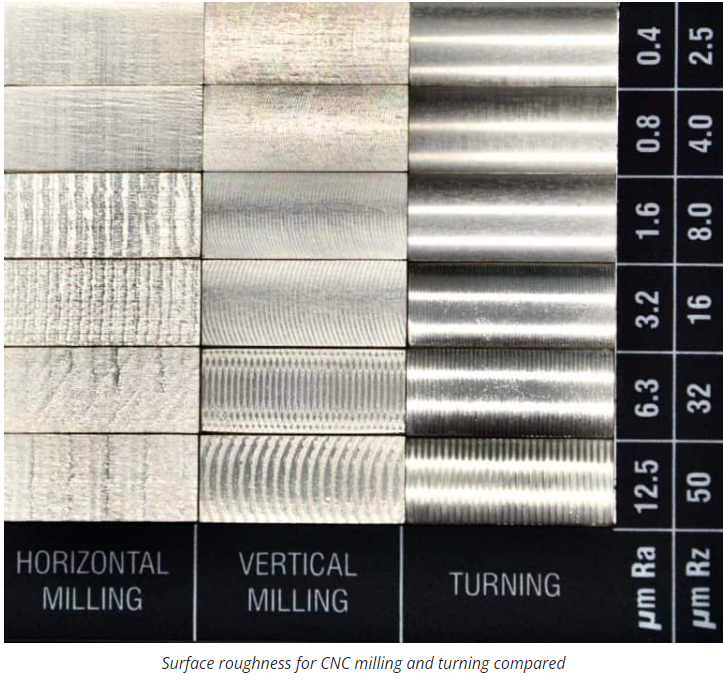
You can see a visual comparison of surfaces with different roughness values in the image below. In addition to changing the look, roughness plays a key role in contact mechanics since higher roughness values increase friction and cause faster wear on components. More roughness also means more surface irregularities that can become nucleation sites for corrosion and cracks. Still, higher values of roughness aren’t necessarily bad; when you’re interested in adhesion, roughness can be a benefit if you choose an appropriate material and surface finishing option.
HOW TO MEASURE SURFACE ROUGHNESS
There are several measuring systems for surface roughness. The systems include:
The direct measurement methods measure surface roughness using a stylus. That involves drawing the stylus perpendicular to the surface. The machinist then uses a registered profile to determine roughness parameters.
Non-contact methods involve the use of light or sound instead. Optical instruments like white light and confocal replace the stylus. These instruments use different principles for measurement. The physical probes can then be switched with optical sensors or microscopes.
First, the instrument used will send an ultrasonic pulse to the surface. Then, there’ll be altering and reflection of the sound waves back to the device. You can then assess the reflected waves to determine roughness parameters.
Comparison techniques employ surface roughness samples. These samples are generated by the equipment or process. Then, the manufacturer uses tactile and visual senses to compare the results against the surface of known roughness parameters.

An example of in-process techniques is inductance. This method helps to evaluate surface roughness using magnetic materials. The inductance pickup uses electromagnetic energy to gauge the distance to the surface. Then, the parametric value determined can help find out comparative roughness parameters.
CONCLUSION
Since getting precise surface roughness will be expensive and challenging in today’s manufacturing, surface finishing operations require the finest strategy to generate desired finishes on fabricated parts.
At IN3DTEC, we offer full dimensional inspection reports, so you can be sure of desired results. We also offer different finishing processes ranging from anodizing, electroplating, bead blasting to polishing, brushing, and more. We are always ready to provide the best service for you.


 English
 Deutsch
 Español
 Français
 Italiano
 日本語
日本語 Русский
 中文
中文


