English
 Deutsch
 Español
 Français
 Italiano
 日本語
日本語 Русский
 中文
中文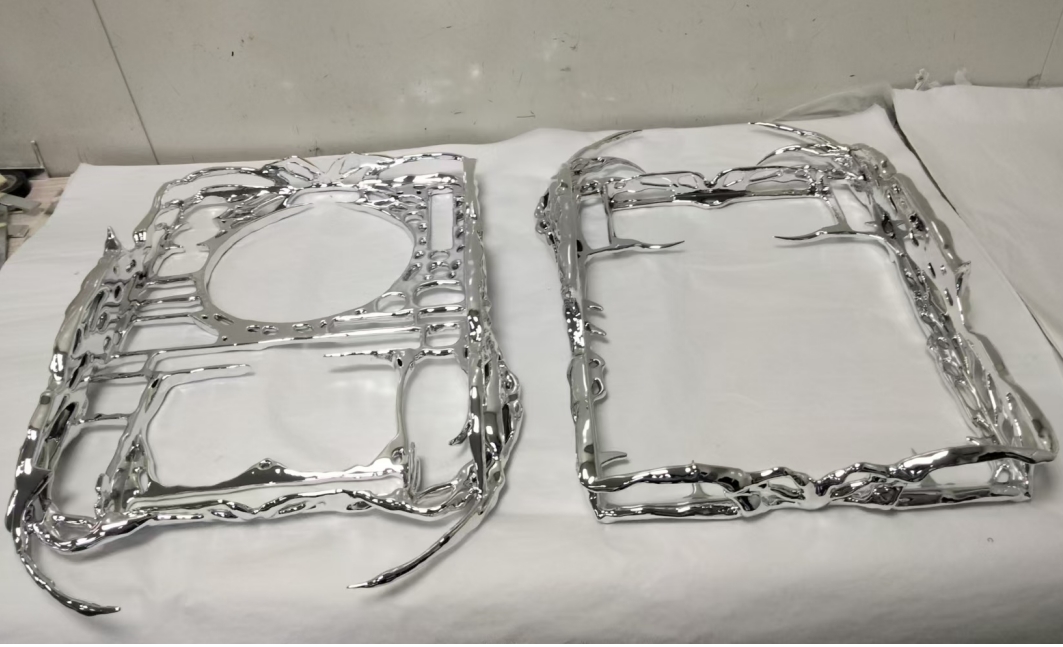
- Author
- 06 November 2025
How to Electroplate SLS Nylon 3D Prints: A Guide to Metallic Finishes
Electroplating has become a popular method for enhancing the aesthetics and functionality of 3D-printed parts. While it’s commonly applied to SLA or FDM prints, SLS (Selective Laser Sintering) nylon prints present a unique opportunity for electroplating d
Electroplating has become a popular method for enhancing the aesthetics and functionality of 3D-printed parts. While it’s commonly applied to SLA or FDM prints, SLS (Selective Laser Sintering) nylon prints present a unique opportunity for electroplating due to their excellent mechanical properties and versatility. If you’ve ever wondered how to transform your SLS nylon 3D prints into durable, metallic-finished components, this guide will walk you through the process step by step.
WHY ELECTROPLATE SLS NYLON 3D PRINTS?
Electroplating on SLS nylon offers several advantages:
Durability: The metallic layer protects the print from wear and tear.
Aesthetics: A shiny, metallic finish transforms a functional part into an eye-catching masterpiece.
Functionality: The metal coating adds electrical conductivity and increased heat resistance.
Customization: Use different metals like copper, nickel, or gold for specific applications.
SLS nylon is an ideal substrate for electroplating due to its porous surface, which allows for strong adhesion of conductive coatings and metal layers.
MATERIALS AND TOOLS YOU’LL NEED
SLS 3D Print: Except for TPU and PP materials, all other SLS-printed materials can be electroplated.
Sanding Tools: Sandpaper (various grits), or using professional tumbling machine with ceramic media.
Conductive Coating: Conductive paint or spray (e.g., silver, graphite, or copper-based)
At IN3DTEC Factory, we can electroplate the parts as large as 1 meter.
Contact us through info@in3dtec.com, or upload your files to our online quoting system to get an instant quote
SLS NYLON 3D PRINTS ELECTROPLATING SETUP
- Electroplating solution (specific to the metal you plan to use)
- Power supply (DC source)
- Electrodes (anode metal corresponding to the plating solution)
- Cleaning Supplies: Isopropyl alcohol or other cleaning agents
- Protective Gear: Gloves, goggles, and a well-ventilated workspace
STEP-BY-STEP GUIDE TO ELECTROPLATING SLS NYLON
Step 1: Prepare the Surface
SLS prints often have a powdery or rough texture that must be smoothed for optimal electroplating results.
- Clean the Print: Remove excess powder from the surface using compressed air or brushing.
- Sanding: Use progressively finer sandpaper (follow 400-600-800-1200-2000) to smooth the surface. For a polished finish, apply a polishing compound after sanding.
- Wash and Dry: Use isopropyl alcohol to remove dust and oils, then let the print dry completely.
Step 2: Apply a Conductive Coating
Since nylon is non-conductive, applying a conductive coating is crucial for the electroplating process.
- Choose the Right Coating: Graphite-based or silver conductive paints work well for nylon.
- Apply Evenly: Spray or brush on the coating, ensuring full coverage, especially in intricate areas.
- Dry Thoroughly: Allow the conductive layer to cure as per the manufacturer’s instructions.
Step 3: Set Up the Electroplating System
Prepare your electroplating bath according to the chosen metal.
- Electroplating Solution: Mix the solution as directed, ensuring the concentration matches the metal you’re using (e.g., nickel, copper, or gold).
- Attach Electrodes:
- Anode: Use a metal electrode of the same type as your plating solution (e.g., copper for copper plating).
- Cathode: Connect your prepared SLS print to the negative terminal of the power supply.
- Immerse the Print: Submerge the part in the electroplating bath, ensuring all conductive areas are covered.
Step 4: Electroplate the Part
- Adjust the Current: Set the power supply to the appropriate voltage and current for your plating process. A lower current ensures a smoother, more uniform coating.
- Plating Time: Monitor the process, as plating time varies depending on the desired thickness.
- Rotate if Needed: For complex shapes, rotate the part periodically to ensure even coverage.
Step 5: Post-Plating Finishing
Once the desired metal layer thickness is achieved, carefully remove the print from the bath.
- Rinse Thoroughly: Use clean water to rinse away residual solution.
- Polish the Surface: Use a polishing compound to enhance the metallic shine.
- Optional Sealant: Apply a clear protective coat to prevent tarnishing or corrosion.
TIPS FOR SUCCESS
- Start Small: Practice on test pieces before plating a critical part.
- Monitor Closely: Overplating can lead to uneven surfaces or cracks.
- Experiment with Metals: Copper is a great base layer; additional layers of nickel or gold can enhance the finish.
APPLICATIONS FOR ELECTROPLATED SLS NYLON PARTS
Electroplating expands the range of applications for SLS nylon prints:
- Functional Prototypes: Stronger and more durable parts for testing.
- Decorative Items: High-quality metallic finishes for display models and ornaments.
- Conductive Components: Electroplated parts for electronics or RF shielding.
CHALLENGES AND CONSIDERATIONS
- Porosity of Nylon: While helpful for adhesion, excess porosity can result in uneven plating. Proper sealing with conductive paint helps address this.
- Cost: Electroplating involves additional materials and equipment, so factor this into your project budget.
- Safety: Work in a well-ventilated area and follow safety guidelines for chemicals and electricity.
CONCLUSION
Electroplating SLS nylon 3D prints is a powerful technique that combines the flexibility of additive manufacturing with the durability and beauty of metal finishes. With the right preparation and tools, you can create parts that are not only functional but also visually striking.
By following this guide, you’re well on your way to transforming your SLS nylon prints into metallic masterpieces, opening the door to countless creative and industrial applications.