English
 Deutsch
 Español
 Français
 Italiano
 日本語
日本語 Русский
 中文
中文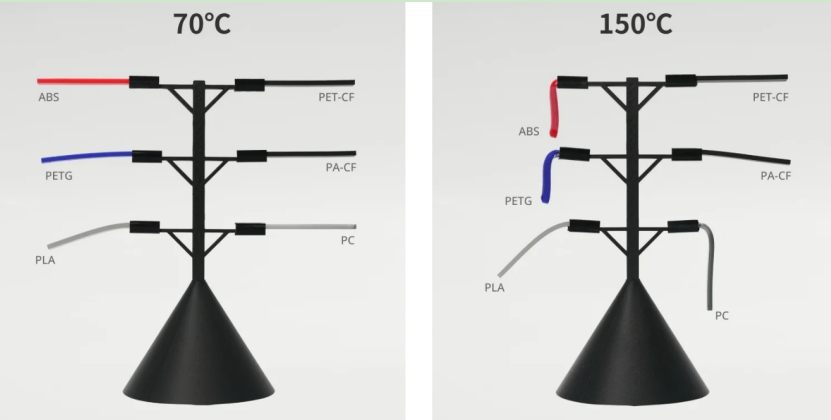
- Author
- 06 November 2025
How to Print PET-CF: A Comprehensive Guide
A technical guide to mastering carbon fiber-reinforced PET with optimized temperatures, hardware, and drying protocols.
3D printing with PET-CF (Polyethylene Terephthalate Carbon Fiber) can elevate your projects due to its superior strength, stiffness, and thermal resistance. However, working with PET-CF requires specific considerations to achieve optimal results. This guide will walk you through the steps and tips for successfully printing with PET-CF.
1. WHAT IS PET-CF?
PET-CF is a composite material made by infusing carbon fibers into PET (Polyethylene Terephthalate) filament. This combination results in a material that is:
- Stronger and stiffer than standard PET, it has a tensile strength of 78Mpa
- Heat resistant 150℃, making it suitable for high-temperature applications.
- Specimen size (L*W*H): 95*10*4 mm³
Test conditions: Specimens were put in an oven at 70 °C and 150 °C respectively for 0.5 hour. - As a crystalline material, PLA will significantly deform only after the temperature exceeds its melting point (around 155°C).
- Image Source: Bambulab
- Lightweight, with improved structural integrity due to the carbon fibers.
2. HOW TO PREPARE YOUR 3D PRINTER FOR PET-CF?
Printer Compatibility:
- Ensure your 3D printer has a hardened steel nozzle. Carbon fibers are abrasive and can wear down standard brass nozzles quickly.
- A heated bed is essential, ideally one that can reach temperatures up to 110°C.
Nozzle Size:
- Use a nozzle size of 0.6mm or larger to prevent clogging. PET-CF can have small carbon fiber fragments that may clog smaller nozzles.
Extruder Type:
- A direct drive extruder is preferable over a Bowden setup, as it provides better control over the filament.
3. PRINTING SETTINGS
Temperature:
- Extruder Temperature: Set between 240°C and 260°C. Start at a lower temperature and gradually increase if the filament does not extrude smoothly.
- Bed Temperature: Set between 100°C and 110°C. Use a bed adhesive like PEI or Kapton tape or PVA glue to ensure good adhesion.
Print Speed:
- Print at a moderate speed, around 60-90 mm/s. PET-CF requires slower speeds for better layer adhesion and surface finish.
Layer Height:
- A layer height of 0.25mm is ideal for balancing detail and strength.
Cooling:
- Enable part cooling fans but keep them at a low setting (around 20-30%) to avoid warping.
4. PREPARING THE FILAMENT
Dry the Filament:
- PET-CF is hygroscopic, meaning it absorbs moisture from the air. Dry the filament in a filament dryer at 70°C for 4-6 hours before printing.
Storage:
- Store PET-CF in a sealed container with desiccant packets to keep it dry when not in use.
5. PRINTING TIPS
- First Layer: Ensure your first layer is well-calibrated. A good first layer adhesion is crucial for the success of the print. Adjust the bed leveling and Z-offset as necessary.
- Adhesion: Use a wider brim( double layers if possible) or raft to improve bed adhesion and prevent warping, especially for larger prints.
- Support Structures: PET-CF can be challenging to remove supports from, so use a minimal support structure or a dual extrusion setup with a soluble support material like PVA.
- Post-Processing: PET-CF prints can be sanded or machined to achieve a smooth finish. Be cautious of the carbon fibers, as they can create fine dust that should not be inhaled.
6. TROUBLESHOOTING COMMON ISSUES
- Nozzle Clogs: If you experience nozzle clogs, increase the print temperature slightly or use a larger nozzle.
- Warping: Warping can be minimized by ensuring the bed is properly heated and using bed adhesives or an enclosure to maintain a consistent temperature.
- Stringing: Reduce stringing by adjusting retraction settings. Increase retraction distance or speed incrementally to find the optimal settings.
- Layer Delamination: If layers are not adhering well, increase the print temperature or slow down the print speed for better layer bonding.
CONCLUSION
Printing with PET-CF can be challenging but rewarding, offering high-strength and high-heat resistance parts. By following the proper printer setup, filament preparation, and printing techniques outlined in this guide, you can achieve excellent results with this advanced material. Happy printing!